MnM User Manual
Welcome to MnM2's world!
You wanted the Semantic Web, now you need the tools to deal with it!
Thank you for your interest in this application.
Table of Contents
0 Introduction
1 Getting Started
1.1 How to Install
1.2 How to Run
1.3 How to Configure: build.xml
1.4 How to Configure: MnM
1.4.1 General Preferences
1.4.2 Browser Preferences
1.4.3 IE Engine Plugin Preferences
1.4.4 I/O Plugin Preferences
2 First Run - An Example
3 The Document Browser
Window
3.1 Opening files
3.2 Saving files
4 Browsing the Ontology
4.1 Choosing the Ontology
4.1.1 Ontology on Server
4.1.2 Ontology on URL
4.2 Creating a New KB
4.3 Loading a KB
4.4 Browse it
4.4.1 Ontology Viewer
4.4.2 Instance Viewer
4.4.3 Information Viewer
5 Marking-up the Document
5.1 Adding and Removing Tags
5.2 Marking-up Lists
5.3 Saving Marked-up Files
6 Populating the Ontology
6.1 Manual Population
6.1.1 Adding New Instances
6.1.2 Modifying Instances
6.2 Semi-Automatic Population
6.2.1 Adding a single tag to a set of instances
6.2.2 Importing tags to a set of instances
6.3 Automatic Population
7 Integration
with Information Extraction Plugins
7.1 Learning
7.2 Extracting
7.2.1 What to do with the results
7.3 Background Learning
7.4 Background Extraction
8 Customization
8.1 Customizing Icons
8.3 Customizing Skins
9 What's Next
10 Troubleshooting
11 Contacts
0 Introduction
MnM is an annotation tool which provides both automated and
semi-automated support for annotating web pages with semantic contents.
MnM integrates a web browser with an ontology editor and provides open
APIs to link to ontology servers and for integrating information
extraction tools.
1 Getting Started
This application requires Java 1.4.1 (or higher) and Ant 1.5.1 (or
higher) in order to run properly.
Java is not provided, it is available for download from Sun website.
Ant is not provided, it is available for download from Ant website.
Other required packeges (provided in the zip file):
- Jena-1.5.0;
- JTidy;
- Kunststoff Look&Feel;
- SkinLF;
- tools.jar (belongs to j2sdk's lib directory).
Note: this application has been tested only under
Windows2000.
1.1 How to Install
Step1: download and install j2sdk following the instructions
provided by Sun. Remember to set the environment variable JAVA_HOME;
Step2: download and install Ant following the instructions
provided by the Apache Ant Project. Unless you (or your system
administrator) are a security freak and you need a signature (PGP or
MD5) for everything you download, you can simply grab the ZIP file.
According to the Ant
manual it is recommended to install Ant in a short path (eg.:
C:\Ant). Remember to set the environment variable ANT_HOME;
Step3: download and unzip MnM2.zip in C:\Program Files\.
Note:When entering the path for JAVA_HOME or ANT_HOME just remember to specify only the
base directory used for the installation and not the path for the binary files (bin).
Tip1: to set environment variables under Windows2000
select Start>Settings>Control Panel.
From the Control Panel double-click on the System
icon. Select Environment Variables... from the Advanced
tab. A new dialog will appear. Choose New... from the System
Variables group and insert the required information.
Tip2: to set environment variables under Linux edit the file
.bashrc in your home directory adding the following line:
export VARIABLE_NAME=<variable_path>;
1.2 How to Run
To execute the application under Windows2000 there are different
options available:
Option1: open the Command Prompt, go to the directory where
MnM has been installed and type "MnM2";
Option2: open Windows Explorer, go to the directory where MnM
has been installed and double-click on the "MnM2.bat" icon;
Option3: follow Option2 and instead of a double-click on
"MnM2.bat" perform a right-click on it and create a shortcut, so that
you can place it on the desktop.
To execute the application under Linux:
- open the console, go to the directory where MnM has been
installed and type "ant -buildfile Java\mnm2.xml"
1.3 How to Configure:
mnm2.xml
In order to increase the speed of the application allow the Java
Virtual Machine to use more memory - at least half of the RAM - certain
plugins are very resource hungry!. You can accomplish this by editing
the file MnM2/Java/mnm2.xml and changing the value of the
option maxmemory in the execute target (to eg: 32m,
64m, ...).
You can fine tune the way MnM behaves by modifying the configuration
file MnM2/Java/mnm2.xml according to the comments included in
the file itself and the documentation you can find in the Ant website.
1.4 How to Configure: MnM
During your first run with MnM it is essential that you spend some time
to set-up the environment you are going to work with. To do this just
open the Preference Dialog from the Settings>Preferences...
menu.
1.4.1 General Preferences
In this section you can specify your settings for Directories
and Look&Feel.
In the Directories tab you can define:
- Working directory: the base directory for the application;
- Plugins directory: the directory in which MnM will look for
plugins, both IE Plugins and I/O Plugins;
- Scenario directory: the directory in which MnM will store
the libraries created by the IE Engines.
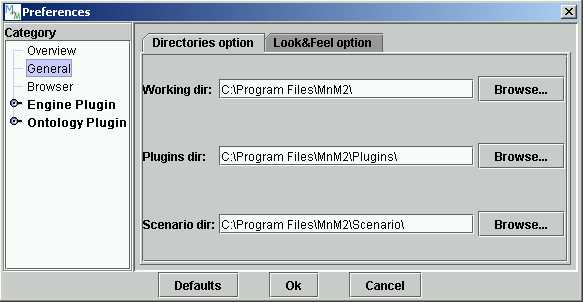
Figure 1.4.1a: Preference Dialog for General settings with the
Directories tab selected
In the Look&Feel tab you can define:
- Look&Feel directory: the directory in which MnM will
look for themes and icon sets;
- Look&Feel theme: the theme to be used by MnM (Metal,
Kuststoff and SkinLf skins). For more information on skins see section 8.2;
- Look&Feel icon set: the icon set to be used by MnM
(Java's default icon set and various icon sets...). For more information
on icons see section 8.1.
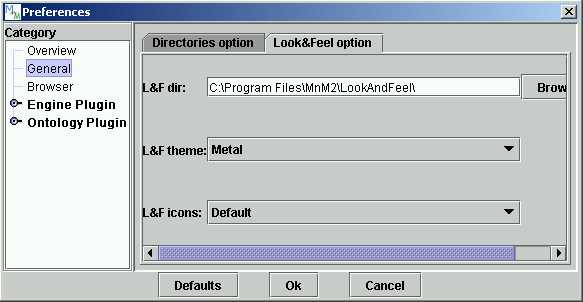
Figure 1.4.1b: Preference Dialog for General settings with the
Look&Feel tab selected
Note: if you have followed our instructions about MnM's
installation directory, you will not need to change the defaults here.
1.4.2 Browser Preferences
In this section you can specify your settings for the basic Web
Browser provided with MnM:
- Home Page: the initial page to open when MnM starts up;
- Use Proxy: check this option if you want to use a proxy
server;
- Proxy Host: the name of the proxy server;
- Proxy Port: the port of the proxy server.
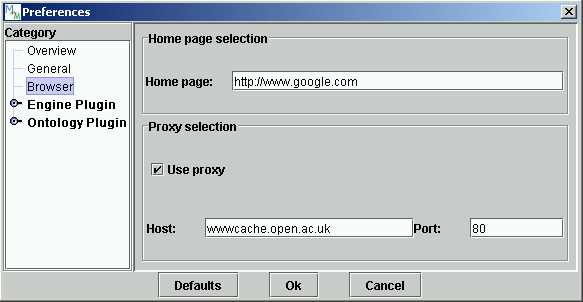
Figure 1.4.2: Preference Dialog for Browser settings
Note: consult your IT guru if you have trouble with
this.
1.4.3 IE Engine Plugin
Preferences
In this section you can define your specific settings for every IE
Engine Plugin stored in the Plugins directory introduced in
section 1.4.1.
MnM does not include any plugin for IE. When more IE Engine Plugins
will be available, to integrate them into MnM simply drop the JAR files
in the Plugins directory. If you are interested in developing
your own IE Engine Plugin for MnM please refer to the MnM Developer Guide.
MnM has been tested with Amilcare an IE Engine developed by Fabio Ciravegna from the
Department of Computer Science, University
of Sheffield. We could not
release Amilcare in the same package and under the same license as MnM.
For this reason if you what to use it you will have to contact Fabio Ciravegna and ask
for the version of Amilcare that he developed specifically for MnM. Once
you have the file Amilcare.zip, please unpack it in C:/Program
Files/MnM2/Java/Amilcare directory and restart the application.
From now on you will be able to use Amilcare within MnM.
Note: unless you are an expert in Information
Extraction techniques or in the IE Engine Plugin you are using, you will
not need to change the defaults here.
1.4.4 Ontology Plugin
Preferences
In this section you can define your specific settings for every
Ontology Plugin stored in the Plugins directory introduced in 1.4.1.
At the moment MnM is bundled with the following Ontology plugins:
- WebOnto;
- Rdf;
- Daml+Oil;
... and much more are on the way...
When more Ontology Plugins will be available, to integrate them into
MnM simply drop the JAR files in the Plugins directory. If you
are interested in developing your own Ontology Plugin for MnM please
refer to the MnM
Developer Guide.
In the current version no preferences are available for these.
2 First Run - An Example
Before diving into the explanation of the amazing features of MnM let's
start with a small example that will introduce the basic functionalities
of MnM.
Step0: decide what to do (populate kb, mark-up documents or
both);
Step1: load an ontology (from a server or a file);
Step2: create/load a Knowledge Base;
Step3: choose the ontology and the class you want to use;
Step4: if you want to Manually populate the KB:
4.a: right-click on the
class for which you want to create a new instance and select Add
new instance...;
4.b: fill in the
required fields;
4.c: commit the new
instance to the KB (OK button);
Step5: select a set of documents to annotate;
Step6: create a directory to store the mark-up documents. We
call this training corpus directory;
Step7: mark-up the documents (open the class that you want to
use if you haven't already done so);
7.a: load a document;
7.b: highlight a piece
of text in the document;
7.c: double-click on the
slot/relation you want to use for the mark-up;
7.d: repeat 7.b
and 7.c until you are happy with the annotation;
7.e: save the annotated
document (in XML format) in the training corpus directory;
7.f: repeat from 7.a
to 7.e until you have marked-up all you documents;
Step8: if you want to Semi-Automatically populate the KB (this
can be done at any moment during Step6):
8.a: select one or more
instances from the KB that you want to modify using the bits of
annotated text;
8.b.i: right-click on
the selected instance(s) and choose Import Mark-up...;
or
8.b.ii: right-click on
the tagged value, in the document, and choose Add to instance(s);
Step9: if you want to Automatically populate the KB:
9.a: select an
Information Extraction plugin;
9.b.i: start the
learning phase on the training corpus (you need 6~8 annotated documents
for a small example or at least 30 documents for a real situation);
or
9.b.ii: if the class has
already a library created by the IE plugin in a previous run just select
it;
9.c: select a set of
non-annotated documents;
9.d: create a directory
to store the non-annotated documents. We call this test corpus
directory;
9.e: start the
extraction phase on the test corpus;
9.f: use the results of
the extraction phase to populate the KB (Accept or Accept
All buttons);
Now the same stuff but with pictures and funny comments!
Step0: decide what to do
Cannot help you here. Sorry...
..but as far as the example is concerned let's say we want to mark-up
some of the documents in the C:\Program Files\MnM2\Archive
directory. All the documents in that folder have the same subject:
someone visiting something or someone else. We will then use the
annotated documents to train the IE machanism provided with MnM (Amilcare), so
that we can later use the library of rules and templates created by it
to extract information from a set of non-annotated documents and
populate our ontology.
Step1: load an ontology
Select Editor>Display, if have just started MnM,
or Editor>Change Ontology..., if you were already
playing with it. This brings up a dialog that will allow you to choose
the ontology we are going to use for this example. Select RDF
from the Urls group, click on Browse... enter the Ontologies
directory and choose example_ontology.rdf. Click on the OK
button to open it.
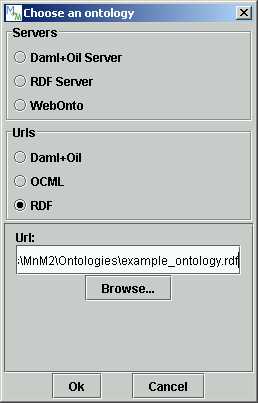
Figure 2a: load an ontology
Step2: create/load a Knowledge Base
Select Editor>Create KB... enter the Ontologies
directory and create a Knowledge Base file called example_ontology_KB.rdf.
Step3: choose the ontology and the class you want to
use
Choosing the ontology is easy, there is only one! Double-click on it to
have a look at the classes that it contains. If you remember our goal,
probably visiting-a-place-or-people will ring a bell.
Double-click on it to reveal its slots.
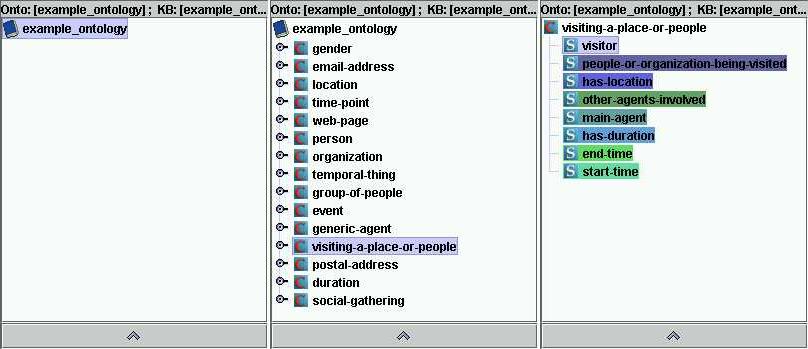
Figure 2b: choose the ontology and the class
Step4: if you want to Manually populate the KB
4.a: right-click on the
class for which you want to create a new instance and select Add
new instance...;
4.b: fill in the
required fields;
4.c: commit the new
instance to the KB (OK button);
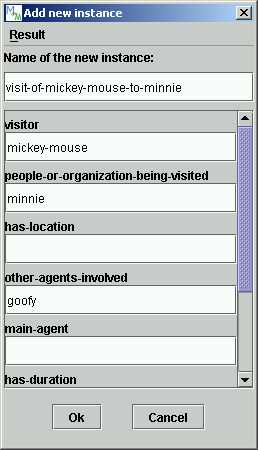
Figure
2c: manually populate the KB
Step5: select a set of documents to annotate
If you remember Step0 the documents are stored in C:\Program
Files\MnM2\Archive. For this example we need to annotate at least
6 documents in order to obtain decent results from the extraction phase.
You can pick 6 documents at random from the ones that you can find in
the Archive directory.
Step6: create a directory to store the mark-up
documents (training corpus)
I shouldn't need to tell you how to create new directories so create a
new one called example_visiting under C:\Program
Files\MnM2\TrainingCorpus.
Step7: mark-up the documents
7.a: load a document (File>Open...);
7.b: highlight a piece
of text in the document;
7.c: double-click on the
slot/relation you want to use for the mark-up;
7.d: repeat 7.b
and 7.c until you are happy with the annotation;
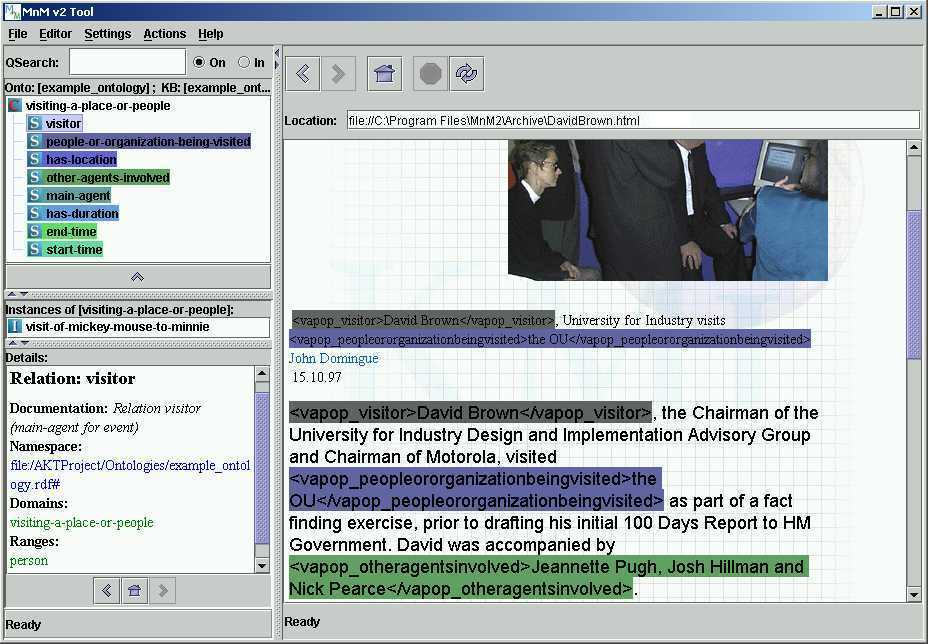
Figure
2d: mark-up the documents
7.e: save the annotated
document (in XML format) in the training corpus directory (File>Save
As...);
7.f: repeat from 7.a
to 7.e until you have marked-up all you documents. At least 6
of them, come on it's not so hard...;
Step8: if you want to Semi-Automatically populate the
KB
8.a: select one
or more instances from the KB that you want to modify using the bits of
annotated text;
8.b.i: right-click on
the selected instance(s) and choose Import Mark-up...;
or
8.b.ii: right-click on
the tagged value, in the document, and choose Add to instance(s);
Step9: if you want to Automatically populate the KB
9.a: select an
Information Extraction plugin (Settings>Select Plugin>Amilcare);
9.b: start the learning
phase on the training corpus (Action>Learn...).
When you are prompted for the path of the training corpus enter C:\Program
Files\MnM2\TrainingCorpus\example-visiting;
9.c: select a set of
non-annotated documents. You can use the documents that you haven't
marked-up from the C:\Program Files\MnM2\Archive directory;
9.d: create a directory
to store the non-annotated documents (test corpus). What about a new
folder called example_visiting under C:\Program
Files\MnM2\TestCorpus;
9.e: start the
extraction phase on the test corpus (Action>Extract...);
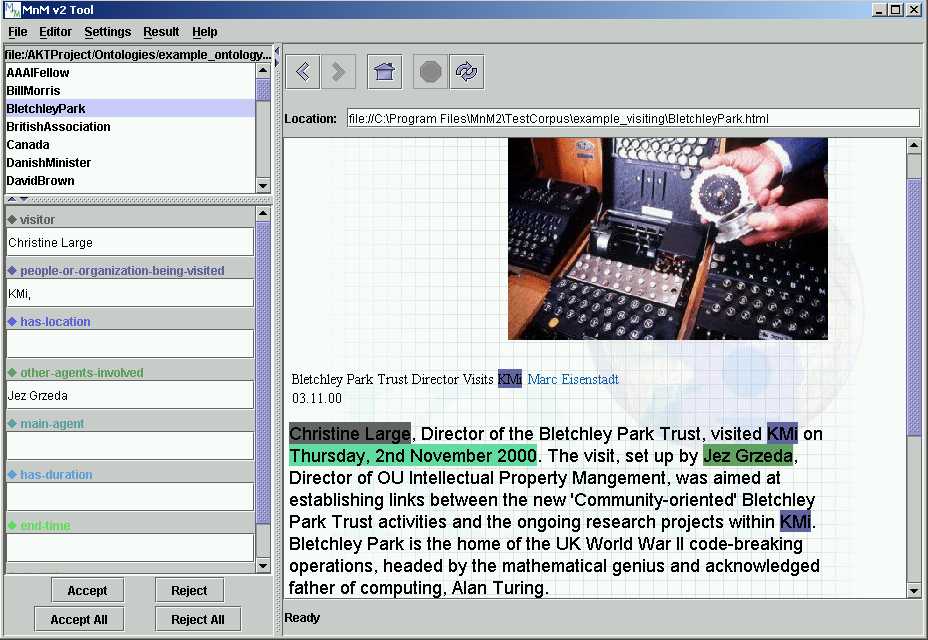
Figure 2e: automatically
populate the KB
9.f: use the results of
the extraction phase to populate the KB (Accept or Accept
All buttons). The results may vary according to the number of
annotated documents used for the learning phase and the way those
documents have been annotated. In Figure 2e you can see the sorts ot
results that we achieved.
3 The Document Browser
Window
The Document Browser provided with MnM is a very minimalistic one. It
has some basic features such as go back, go forward,home,refresh,stop
and history management. It can display TXT documents and pure
HTML documents (as specified by the W3C)
with no frames
3.1 Opening files
When opening a file, if an IE plugin and an ontology class with an
associated library for IE are selected, MnM will perform a background
extraction operation (see section 7.4).
In this case the newly opened page will be augmented with some
suggestions on how to mark-up the document. The user can confirm, remove
or simply ignore the suggestions.
3.2 Saving files
When saving a file (that has been previously marked-up) in XML format,
if an IE plugin and an ontology class with an associated library for IE
are selected, MnM will perform a background learning operation(see
section 7.3). This is done in order
to improve the IE library associated with the selected class by adding
the annotated information included in the document.
Note: by "an associated library for IE" we mean the
set of rules and templates that has been created by an IE mechanism
during the learning phase (see section 7.1)..
4 Browsing the Ontology
In this section you will find some information on how to use the
Ontology Browser embedded in MnM to browse the ontology of your choice.
4.1 Choosing the Ontology
Before browsing an ontology you need to load one. You can load an
ontology to browse every time the Ontology Browser is displayed (Editor>Display)
or every time you decide you want to work with a different ontology (Editor>Change
Ontology...). After selecting one of the previous commands you
will be prompted for either a server or an Url for the ontology.
You can choose to access ontologies stored on a remote server, such as
WebOnto, or ontologies stored locally in a file, written in RDF,
Daml+Oil or OCML
4.1.1 Ontology on Server
If you choose to browse an ontology from a server you will be asked to
enter the host name and host port and if the server accepts the
connection you will be asked to enter a login name and password.
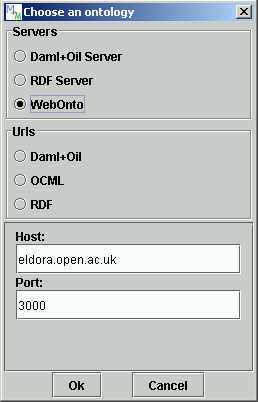
Figure 4.1.1: accessing ontologies from a server
4.1.2 Ontology on URL
If you choose to browse an ontology stored locally you will be asked to
enter the path where it resides.
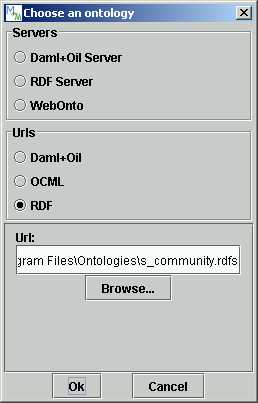
Figure 4.1.2: accessing ontologies as a file
4.2 Creating a New KB
Before you can populate the ontology you have to create a new Knowledge
Base (Editor>Create KB...) or load an existing one.
There are two different ways to create a new Knowledge Base:
- ontology from a server: in this case you will be asked to enter some
details for the new KB: ontology name, parent ontology, additional
editor(s) and ontology type;
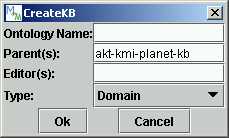
Figure 4.2: creating a new Kb from a server
- ontology as a file: in this case you will be asked to enter the path
where you want the new KB to be saved. If you omit the file extension,
MnM will use the default one according to the format of the current
ontology.
4.3 Loading a KB
To load an existing Knowledge Base select Load KB...
from the Editor menu.
There are two different ways to load an existing Knowledge Base:
- ontology from a server: in this case the process is automatic and the
KB associated to the selected ontology will be loaded automatically by
the server;
- ontology as a file: in this case you will be asked to enter the path
where the existing KB is located.
4.4 Browse it
The Ontology Browser window is composed of 5 units:
- QSearch Toolbar: this quick search facility allows the user
to perform incremental searches on the Ontology Viewer (if On
is selected) or on the Instance Viewer (if In is selected);
- Ontology Viewer: displays the ontology structure as a
tree-like structure (Ontologies, Classes and Slots);
- Instance Viewer: displays the instances belonging to the
selected class;
- Information Viewer: displays the information regarding
selected ontology elements or selected instances provided by the loaded
ontology;
- Status Bar: monitors the progress of background learning
and background extraction (see section 7.3
and section 7.4).
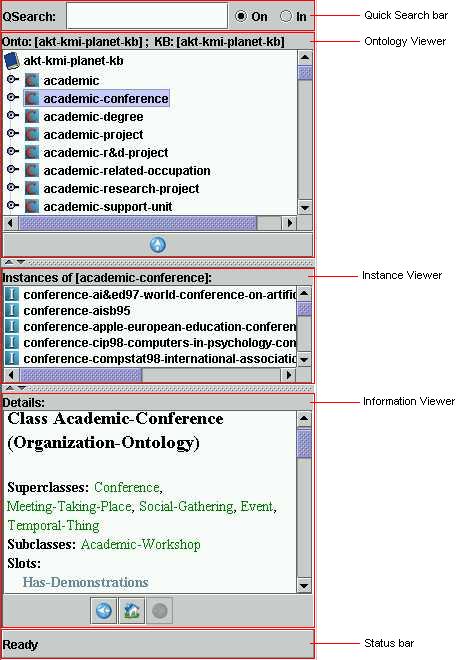
Figure 4.4: the Ontology Browser
4.4.1 Ontology Viewer
The Ontology Viewer displays the ontology structure as a tree-like
structure (Ontologies, Classes and Slots).
To navigate the ontology tree just double-click on the element you want
to expand. To go back one level in the ontology tree you need to click
on the arrow at the bottom of the Ontology Viewer or double-click on the
root element.
A right-click on a Class will popup a menu with the following options: Add
new instance... (see section 6.1.1)
and Available Plugins (if any), this will provide the list of
all the IE Plugins that have an IE library for the class. Selecting one
of the plugins from the list will initialize it and it will become the
active plugin. From this moment all the learning and extraction
processes will be handled by the new plugin. For more information on IE
Plugins see section 7.
A double-click on a Slot will mark-up the document currently displayed
in the Web Browser adding a tag, unique to the Slot, to the highlighted
piece of text (see section 5.2).
In the Ontology Viewer a Class might have different
icons depending on whether or not it has some IE library for the active
IE Plugin:
- red icon: the class has no IE library associated with it or there is
no active IE Plugin;
- green icon: the class has an IE library associated with it belonging
to the active IE Plugin, but the plugin developer has not provided a
custom icon;
- custom icon: the class has an IE library associated with it belonging
to the active IE Plugin and the plugin developer has provided an icon.
It is possible to filter the Classes
in the Ontology Viewer if the option Show only classes with a
library from the Editor menu is turned on or off.
4.4.2 Instance Viewer
The Instance Viewer displays the instances belonging to the selected
class.
A right-click on an Instance will pop up a menu with the following
options: Import Mark-up (see section 6.2.2),Rename
and Remove.
A double-click on an Instance will open a new dialog that allows the
user to modify the instance manually (see section 6.1.2).
4.4.3 Information Viewer
The Information Viewer display the information regarding selected
ontology elements or selected instances provided by the loaded ontology.
All the information provided is in HTML format and is fully browsable
(with a double-click on the piece of text you want more info about). It
has some basic features such as go back, go forward,home
and history management.
5 Marking-up the Document
MnM is a tool for Semantic Mark-up (whatever that means), isn't it? So,
let's start talking about it!
In this section you will learn how to annotate a document. The first
section explains the easy way to add and remove tags from a document. In
the next sections (more to come...) some tricks will be introduced to
speed up the process of marking up a document, because annotating
can be boring and time consuming.
5.1 Adding and Removing Tags
To add a tag to the document:
- open a Class in the Ontology Browser so that you can see the Slots
that it contains;
- highlight the piece of text in the Web Browser window that you want
to mark-up;
- double-click on the Slot that you want to use to annotate the
document.
Sometimes you make mistakes, other times you change your mind...
To remove a tag from the document:
- in the Web Browser window right-click on the tag you want to remove
and select Remove Tag from the popup menu that will appear.
5.2 Marking-up Lists
If you have to mark-up each element in a list (e.g.: black, grey,
white, red, green, blue and yellow) there is a better way than
highlighting every single element in it and double-clicking on the Slot
to add the desired tag.
You can simply highlight the whole list and double-click on the Slot to
add the tag, then right-click on the inserted tag and select Tokenize
List... from the popup that will appear. At this point you can
choose one or more separator, or define your own, to use for tokenizing
the list.
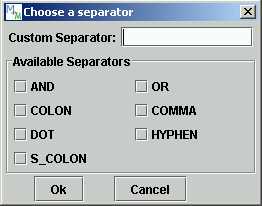
Figure 5.2: How to tokenize a list
5.3 Saving Marked-up Files
After you have finished annotating the current document in the Web
Browser windows you can save it by selecting SaveAs... in the File
menu.
The default format to save marked-up documents is XML. MnM tries to
preserve the structure of the original document. In order to do so it
uses JTidy to grant the well-formedness of the HTML document that has
been annotated before transorming it into an XML document. This is also
the standard format accepted by most of the IE Plugins for annotated
documents to be used during the learning phase. For further information
on Information Extraction Plugins see section 7.
6 Populating the Ontology
In this section chapter you will find out how to add and modify
instances in the ontology you are browsing.
Tip: before adding or editing instances you have to
create a new KB (see section 4.2) or
load an existing one (see section 4.3).
6.1 Manual Population
Manual population is done entirely by "hand" by the user without using
any information gathered while annotating the document and without any
help from the IE Plugins.
6.1.1 Adding New Instances
Right-click on a Class in the Ontology Viewer and select Add new
instance... from the popup menu that will appear to open a dialog
in which you can insert all the necessary data to create a new instance
of the selected class.
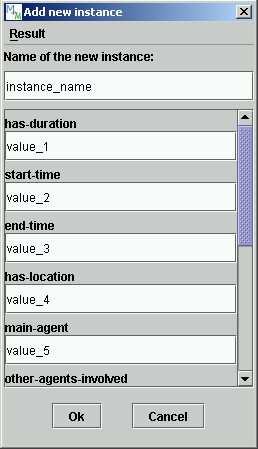
Figure 6.1.1a: adding a new instance
In the dialog that is displayed you will see a menu
entry called Result. In this menu there are two sub-menus:
- Output Action: here you can decide what to do with the
instance you are working on: commit it to the ontology, save it in a
local file or print it in the console (Command Prompt) for debugging
purposes;
- Output Format: in this sub-menu you can choose the format
to give to the instance: default (the format used by the selected
ontology), Daml+Oil, Ocml, Rdf or Xml. It is only possible to commit the
instance to the ontology when the Default format is selected.
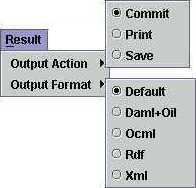
Figure 6.1.1b: the Result menu
6.1.2 Modifying Instances
Double-click on an Instance in the Instance Viewer to open a dialog
with which you can modify the selected instance.
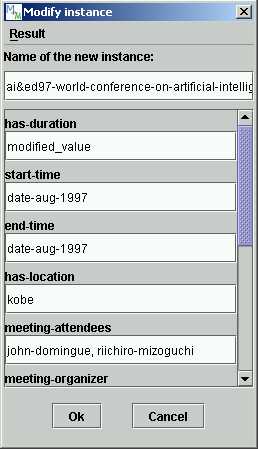
Figure 6.1.2: modifying an instance
6.2 Semi-Automatic
Population
Semi-Automatic population is done using the information gathered while
annotating the document.
6.2.1 Adding a single tag to a
set of instances
It is possible to modify the value of a field of one or more instances
in the ontology by selecting the tagged value in the document.
To do this:
- mark-up the document;
- select a set of instances (one or more) from the Instance Viewer;
- right-click on the tagged value that you want to use to modify the
selected instance(s) and select Add to instance(s) from the
popup menu that will appear.
6.2.2 Importing tags to a set of
instances
It is possible to modify the values of a set of fields of one or more
instances in the ontology with a set of values that have been previously
tagged.
To do this:
- mark-up the document;
- select a set of instances (one or more) from the Instance Viewer;
- right-click on it and select Import Mark-up... (Import
Mark-up into Selection... in case multiple instances are selected)
from the popup menu that will appear;
- the Import dialog, containing the marked-up information, will be
displayed;
- select the set of values that you want to use to modify the selected
instance(s) from the Import dialog and select Ok.
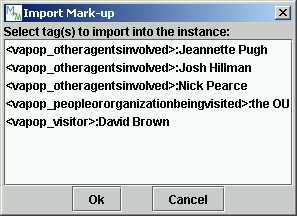
Figure 6.2.2: Import dialog
6.3 Automatic Population
Automatic population is done using the information extracted by the IE
Plugins from a set of documents. This is known as the test corpus.
To populate an ontology using Information Extraction techniques simply
activate an IE plugin (Settings>Select Plugin).
Then select the Class in the Ontology you want to populate from the
Ontology Browser. Start the extraction phase by selecting Action>Extract...
and specifying the location of the test corpus. You can then use the
results provided by the IE mechanism to populate the ontology. For
further information see section 7.2.
Note: Automatic Population can be done only if an IE
Engine Plugin is installed in your system.
7 Integration
with Information Extraction Plugins
Once upon a time someone asked: "Why don't we try to integrate IE with
a Semantic Mark-up tool?".
Well, we did it. ...and it works! ...and it is damn cool! ...and it can
also speed up the process of annotating documents and populating
ontologies (a couple of side effects that we couldn't get rid off! :P ).
The first thing to do when dealing with an IE mechanism is teaching it
what you want it do for you. In other words you have to make it learn
what kind of information is important to you (the learning/training
phase), so that eventually it will be able to extract the same kind of
information by itself (extraction phase). In order to train the IE
mechanism you have to provide a set of annotated documents (training
corpus) on which it can create rules and templates; those rules and
templates will then be used from the same IE mechanism to extract
information from a set of new and non-annotated documents (test corpus).
Annotating documents is the most delicate step when training an IE
system, because if you annote the wrong thing it will try to extract
information from new documents using the wrong rules and wrong
templates, so the results will be completely unreliable.
Let's try with an example, suppose we want to annotate the following
sentence:
"Mickey Mouse visited Minnie. Mickey was accompanied
by Pluto and Goofy."
a possible annotation could be:
"<visitor>Mickey Mouse</visitor>
visited <person-being-visited>Minnie</person-being-visited>.<visitor>Mickey</visitor>
was accompanied by <other-people-involved>Pluto and
Goofy</other-people-involved>."
another way of annotating the same sentence might be:
"<visitor>Mickey Mouse</visitor>
visited <person-being-visited>Minnie</person-being-visited>.<visitor>Mickey</visitor>
was accompanied by <other-people-involved>Pluto</other-people-involved>
and <other-people-involved>Goofy</other-people-involved>."
Passing the previous sentences to the IE mechanism for the learning
phase will produce different rules and templates and consequently
different results when extracting information from non-annotated
documents. In any case the best way of annotating a document depends on
the IE mechanism you are using, so for further details and suggestions
please refer to the user manual provided by the developer of your
favorite IE tool. If you have a new IE Plugin and you want to add it to
MnM just put it in the Plugins directory (see section 1.4.1) and restart the application.
Another thing to keep in mind while annotating documents is that most
of the IE mechanisms out there create rules and templates according both
to positive and negative examples. A positive example
is when you have a relevant sentence and you mark it up so that the IE
mechanism can learn on it and later extract the same kind of
information. A negative example is when you have a relevant sentence and
you don't annotate it. In this case the IE mechanism will create new
rules and templates considering the non-annotated sentence as something
that the user is not interest in, therefore during subsequent extraction
phases the algorithm will skip similar sentences. All this is to say
that if in the same document you have more than one relevant sentence
(eg.: Last monday Mickey Mouse visited Minnie. [...] The next day Mickey
received a visit from Goofy. [...] During the week-end they visited
Donald Duck and Daisy Duck. [...]) remember to annotate them all.
The number of annotated documents to be used as training corpus varies
according to the IE mechanism used, but the following general rule
applies:
"the more the better". For a small example 6~8 annotated documents
would do, but for a real life situation 30 mark-up documents is a must.
Tip: to activate one the IE plugins open the Settings>Select
Plugin menu.
7.1 Learning
Once a set of document has been annotated and is safely stored in a
directory on your machine you can start the learning phase by first
specifying the Class that has been used for the mark-up from the
Ontology Viewer and then selecting Learn... from the Actions
menu. At this point you will have only to provide the location of the
training corpus and wait for the IE mechanism to do its job so that you
can continue with your work.
Learning is an active process and while it is executing MnM is frozen
and cannot perform any other task. According to the number and length of
the documents in the training corpus the learning phase might take from
a couple of seconds to some hours.
Note: Every time the same Class is used for the
learning phase the rules and templates previously created will be
overwritten. For this reason if you want to improve your IE library you
will have to add the new annotated documents to the old training corpus.
Tip: Remember to store documents annotated using
different classes in different directories or else the IE mechanism will
fail to recognize the different sets of tags used for the mark-up. This
is because when the learning phase starts the IE mechanism is provided
with the set of tags given by the class used to mark-up the documents.
If during the learning phase the training corpus directory contains
documents annotated with a set of tags different from the one provided
to the IE mechanism, those documents will be completly ignored, or, in
the worst case, the IE plugin will abort the learning process and no
rules and no templates will be generated.
7.2 Extracting
To start extracting information from a set of documents specify the
Class with the library that you want to use to "guide" the extraction
phase from the Ontology Viewer and then select Extract... from
the Actions menu. At this point you will only have to provide
the location of the test corpus. Once the IE mechanism has done its job
the you will have the opportunity to check the results of the extraction
and decide what to do with them.
Extraction is an active process and while it is executing MnM is frozen
and cannot perform any other task. According to the number and length of
the documents in the test corpus the extraction phase might take from a
couple of seconds to some hours.
7.2.1 What to do with
the results
Once the extraction process is over, the Results Browser will be
displayed. In the upper part you can find the list of all the relevant
documents belonging to the test corpus (a document is relevant if
something has been extracted from it). All the documents are sorted by
their filename. Additionally the filenames are also used to name the
instances that will be created every time you choose to commit the
results to the ontology. So if you don't like the name the new instance
is going to have just right-click on it and rename it.
Every time a document is selected from the list the extracted
information will be displayed in the main part of the Result Browser. At
this point the user can check, correct and edit the results. It is also
possible to add new values and fill in empty fields.
The selected document will be also opened in the Web Browser window.
All the concepts found by the IE mechanism will be highlighted in
different colors to allow the user to spot them more easily inside the
document.
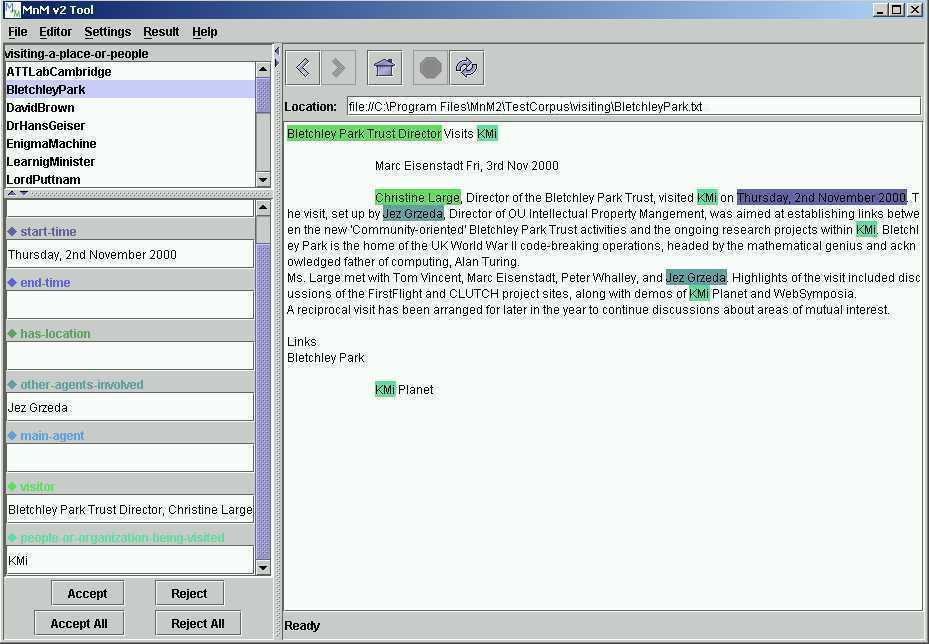
Figure 7.2.1a: Checking the results
Once you are ready you can decide what to do with results:
- Accept: create a new instance using the information
extracted from the selected document;
- Reject: delete the results that the IE mechanism has
provided for the selected document;
- Accept All: you trust the IE mechanism or you don't want to
bother checking the results, therefore a new instance will be created
for each document in the test corpus using the extracted information;
- Reject All: delete all the results that the IE mechanism
has provided for all the documents in the test corpus. This works also
as a cancel.
It is also possible to customize the behaviour of Accept and Accept
All by opening the Result menu which is now available in
the menubar. In this menu there are two options:
- Output Action: here you can decide what to do with the
instance you are working on: commit it to the ontology, save it on a
local file or print it in the console (Command Prompt) for debugging
purposes;
- Output Format: here you can choose the format to give to
the instance: default (the format used by the selected ontology),
Daml+Oil, Ocml, Rdf or Xml.

Figure 7.2.1b: Deciding what to do with the results
7.3 Background Learning
When saving a file in XML format that has been previously marked-up, if
an IE plugin and an ontology class with an associated library for IE are
selected, then MnM will perform a background learning in order to
improve the IE rules and templates related to the selected class with
the information included in the new document.
Background Learning is a background process and will not affect the
normal use of MnM so the user can continue with his work without any
interruption.
Note: If this option is turned on remember to save the
new annotated document in the same directory where the corresponding
training corpus is located or else the IE mechanism will try to create
new rules and templates using only one document, the new one! In this
case there will be heavy degradation in the precision of the IE
mechanism during the extraction phase.
Tip: To turn off this feature uncheck the Enable
Background Learn option in the Actions menu.
7.4 Background Extraction
When opening a file, if an IE plugin and an ontology class with an
associated library for IE are selected, then MnM will perform a
background extraction and the newly opened page will be augmented with
some suggestions on how to mark-up the document. At this point the user
can confirm, remove or simply ignore those suggestions.
Background Extraction is a background process and in general will not
affect the normal use of MnM so the user can continue with his work
without any interruption. It is possible, though, to experience some
slight delays when loading documents in the Web Browser window.
Tip: To turn off this feature uncheck the Enable
Background Extract option in the Actions menu.
8 Customization
All of the above is really interesting, but we also aim to please your
eyes. That's why a bit of Look&Feel will make no harm.
MnM allows the user to choose between a set of default skins and icons
to modify the appearance of the application. MnM also allows the user to
create his/her own icon set or skin.
8.1 Customizing Icons
To create your own icon theme you just have to provide a ZIP file
containing a set of icons and put it in the Look&Feel directory
(see section 1.4.1).
The icons must be in PNG format and stored at the base level of the ZIP
file (not in a directory). You must include the following icons:
- Back16.png, Back24.png: 16 pixels and 24 pixels
version for the Back icon;
- Forward16.png, Forward24.png: 16 pixels and 24
pixels version for the Forward icon;
- Home16.png, Home24.png: 16 pixels and 24 pixels
version for the Home icon;
- Refresh16.png, Refresh24.png: 16 pixels and 24
pixels version for the Refresh icon;
- Stop16.png, Stop24.png: 16 pixels and 24 pixels
version for the Stop icon;
- Up16.png, Up24.png: 16 pixels and 24 pixels
version for the Up icon.
8.2 Customizing Skins
MnM uses SkinLF to provide a
skinnable user interface. This package allows the creation of themepacks
to change the way the UI is displayed. Some themepacks are already
included in the MnM package. If you want to create your own themepack
please refer to the SkinLF
documentation.
9 What's Next
ToDo:
- more plugins for I/O;
- more plugins for IE;
- deep search mechanism for the whole ontology;
- easy way to annotate complex lists, such as a list of references or
bibliographic data;
- ...
10 Troubleshooting
Known issues regarding Amilcare:
- if the set of documents used for the learning phase contains some
special characters (eg.: &) out of a tag, Amilcare will display an
error like: "There is a problem in writing the temporary file
C:\Program Files\MnM2\Java\Amilcare\Temp/TempAmilcareFile.txt See
transcript", followed by an "Amilcare: error: see output for
details". This is due to an XML parsing error and can be solved by
just replacing "&" with "and".
- sometimes the Amilcare Progress Dialog will appear only the first
time the learning or the extraction phase is executed and will not be
displayed again until the whole application has been restarted. This bug
does not prevent Amilcare from running properly and producing
correct results.
Known issues regarding JTidy:
- if JTidy doesn't know how to correct an error, while checking for the
well-formedness, it may remove some of the content from the document.
11 Contacts
Enrico Motta (e.motta@open.ac.uk)


