Setting user preferences (optional)
You don't normally need to worry about the Preferences settings, since the login settings created when you first connect will be remembered for you. However, for more advanced users, here are the possibilities available when you select Jabber... Preferences from the top menu bar:
The 'Login' Preferences tab:
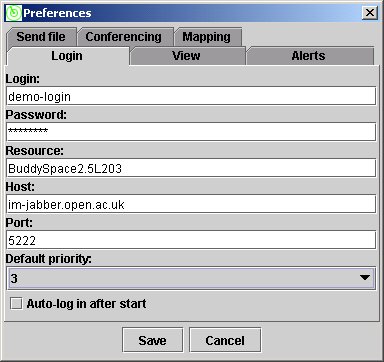
Figure 3. First preferences 'tab' on the Jabber...
Preferences... menu
('pro' versions also have a 'Plans' tab...see below)
- On the first 'tab', you'll see Login preferences. The first five preference items correspond exactly to those described above: Login, Password, Resource, Host, Port. These are saved in your preferences after the first time you log in, but you can change them if you need to log in to different servers.
- Default priority is useful if you run multiple Jabber clients (which you can do on one or more machines simultaneously). Multiple clients can behave like different 'personalities', even when using the same login name (you just specify a different resource for each one to keep them distinct). The resource with the highest priority is the one that 'grabs' chat messages by default.
- Auto-log in after start: tick (check) this box if you want to log in automatically the next time you launch BuddySpace.
![]()
The 'View' Preferences tab:
These preferences are similar to the options you'll see on the main View menu, except that the purpose of the items on the Jabber... Preferences... View tab is to set the default appearance in a persistent manner, i.e. what you'll see the next time you launch BuddySpace; in contrast, setting the comparable options in the main View menu takes immediate effect, but does not necessarily affect what you'll see the next time you launch BuddySpace.
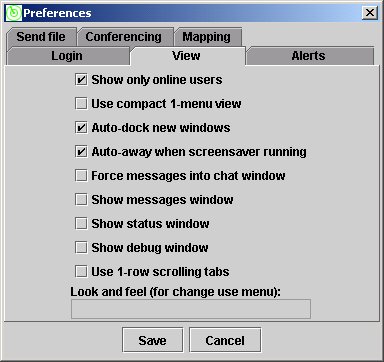
Figure 5. The 'View' preferences tab on the Jabber...
Preferences... menu
Check and uncheck (tick and untick) the choices displayed in the Jabber... Preferences... View tab to achieve the following:
- 'Show only online users' displays only those users in your roster who are actually logged in at the moment, rather than displaying the entire list;
- 'Use compact 1-menu view shrinks the top menu bar to a single super-menu item called 'Menu', and displays every other menu choice as a list embedded within that one.
- 'Auto-dock new windows' (recommended) means
that when new chat windows and other message windows appear they are
automatically 'docked' as a tab within the main or 'master' BuddySpace
window. They can always be 'floated off' separately and re-docked later
on. [see also Auto-popup new messages on the Alerts
tab, below]
Note for Java Runtime Engine 1.3 users: Most BuddySpace windows can be floated or re-docked at your own discretion using the 'sailboat' and 'anchor' icons respectively, provided you are using Java J2SE JRE 1.4 or higher; for JRE 1.3 these two icons are disabled for most BuddySpace windows, so you just need to decide, using this 'Auto-dock new windows' preferences setting, whether or not you want auto-docking for all windows.
- 'Auto-away when screensaver running' [Windows only]: when checked, it causes BuddySpace to notice when your screensaver starts, and automatically sets your Presence to 'Away - screensaver running'. This helps you avoid people thinking you are at your desk when you're not, and for this reason many users enable this feature and then set their screensavers to come on after (say) 5 minutes.
- 'Force messages into chat window' converts the one-off email-like messages that would otherwise appear in the dedicated 'Messages' pane into a chat-like message, which some users find more convenient.
- 'Show messages window' enables the appearance of the otherwise hidden list of headers of stored (email-like) messages. These may be read by clicking on each header in turn, and selecting the Delete button for those you don't wish to save (it's a good idea to delete by default: this is not email!).
- 'Show status window' enables the display of a tab/window showing some of the innards of Jabber communication.
- 'Show debug window' is of interest primarily to BuddySpace developers.
- 'Use 1-row scrolling tabs' turns all the multiple chat and map windows into a single line of tabs that will scroll to the left and right (instead of stacking up vertically). This scrolling tabs option depends on Java J2SE JRE 1.4 or higher; for JRE 1.3 the option is simply ignored.
- 'Look and Feel' is only for saving a setting you have already selected in the main (top menu bar) View menu. That menu (described below) lets you select from among several options that alter the general colour scheme and menu/button appearance to look like that of typical Java applications (Metal), Unix interfaces (CDE/Motif), Windows, or Macintosh Aqua. On a Windows machine, selecting the Windows look and feel will allow you to alter the appearance to match whatever you have set using your Control Panel... Display... Appearance options. Note that saving a custom look and feel (other than the default 'Metal') can slow down the BuddySpace launch time by a factor of two or three!
![]()
The 'Alerts' Preferences tab:
- 'Auto-popup new messages' brings new messages and chat windows directly to the front when this is checked, whereas leaving it unchecked yields a more subtle alert (the tab is highlighted in red but remains in the background).
- 'New message notification sound': here is where you specify an audio file, preferably of modest sound and short duration, to catch your attention when a new message comes in. We supply one for you (./sounds/minor7th.wav), but you can specify your own favourite.
![]()
The 'Send file' Preferences tab:
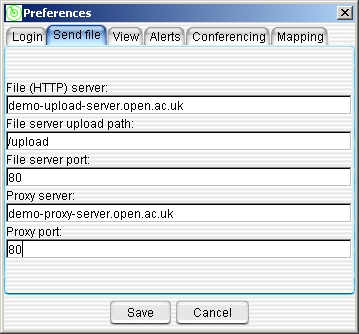
Figure 4. Second preferences 'tab' on the Jabber...
Preferences... menu
- 'File (HTTP) server', 'File server upload path', and 'File server port' are needed to specify an intermediate server that holds files temporarily while they are relayed from user to user. (The file server shown in figure 4 above is not a real server address.)
- 'Proxy server' and 'Proxy port' may be necessary if you are operating from behind a firewall, and have problems accessing the default port (5222). (The proxy server shown in figure 4 above is not a real server address.)
![]()
The 'Conferencing' Preferences tab:
- Default conferencing server' is a server
that hosts multi-user (groupchat) rooms. This will typically be something
such as
conference.jabber.org
The 'Mapping' Preferences tab:
- 'Local path for maps' is the relative location of the folder where BuddySpace maps are stored. The default is './maps', which means that if you stored all of BuddySpace in the directory C:/Program Files/BuddySpace (say), then the maps would be found in C:/Program Files/BuddySpace/maps.
- 'JID of pubsub server component
for maps'
['PRO' and OU student versions only] is
a way of providing automatic map updates through a special server. For
Open University users, it will be a server such as
jabber-dev-component.open.ac.uk (this should already be filled in). - 'Maps node in the pubsub server compenent' ['PRO' and OU student versions only] is the specifc place where maps for your group are stored. For members of an automatically-subscribed roster group such as '[OU] KMi', it would have a case-sensitive name like generic/KMi/maps
The 'Plans' Preferences tab [PRO version only]:
'Plans' are a method for users to store in a simple text file a little bit of information about their upcoming activities, to which others in their workgroup may subscribe and view (e.g. "Around most of January, with the exception of 10th-14th"). When you publish a plan, others may then access it with a right-click on your presence 'dot', either in the roster or in a map, whereupon the menu choice 'Get plan' will appear. The following preferences need to be set for this to work:
- 'JID of pubsub server component
for plans' is a way
of providing information concerning personal textual information that
we call 'plans' through a special server. For Open University users,
it will be a server such as
jabber-dev-component.open.ac.uk (this should already be filled in).. - 'Show plan updates', when checked, will automatically alert you when there has been a change to a plan for which you have suscribed (using the menu item Jabber... Plans... Subscribe to plan...
- 'Use only with this resource'. [Remember, 'resource' is just a text string specifying some user details, such as 'BuddySpace-home', as described in the login section.] When checked, this option means that if you run BuddySpace when logged in separately with two or more different resources (such as 'BuddySpace-home' and 'BuddySpace-work'), the plans will be stored separately for each. Conversely, when un-checked (the default), then plans for your Jabber ID, e.g. foo123@jabber.open.ac.uk, will be harmonised into one regardless of which 'resource' you are using.
To publish your own plan, the very first time you need to select the menu option Jabber... Plans... Init my plan. From then onwards, you can select Jabber... Plans... Publish my plan and fill in whatever you deem suitable for viewing by others who have subscribed to your plan!
To see another user's plan, you need to be 'subscribed' to their plan, which you enable by selecting the menu option Jabber... Plans... Subscribe to plan... (and then selecting the user from the popup menu). From then onwards, you can then access that user's plan with a right-click on their presence 'dot', either in the roster or in a map, whereupon the menu choice 'Get plan' will appear